Honda’s K24 engine is fairly bulletproof. Factory-forged components and overall smart engineering has pushed some of these motors to over 500,000 miles without any major issues. However, a few things are known to fail from time to time.
The accessory belt tensioner is one of them. Today we’ll walk you through diagnosing and replacing the tensioner, while we’ll also cover the tools that you’ll need to get this job done. Fortunately, this is a fairly easy procedure that can be done in under an hour.

Recognizing the First Signs of Trouble
The accessory belt tensioner on K24 engines is a simple spring and pulley system. Coincidentally, these are the two components that can cause you trouble given enough miles. Fortunately, both are extremely easy to diagnose.
Tensioner Pulley Failure

One of the most common causes of the accessory belt tensioner failure on a K24 is a bad bearing. You’ll usually hear it when you start the engine first thing in the morning. The noise will most likely progressively become louder the longer you drive.
Look out for a sound similar to ball bearings in an empty soda can. If you hear this and want to check if it’s the tensioner pulley, take a long screwdriver, press the tip against the pulley mount, and then press your ear against the handle. If you hear that same noise, it’s most likely the pulley. Be extremely careful when doing this. Try not to put the screwdriver anywhere close to the accessory belt.
Tensioner Spring Failure

The other thing that can fail is the tensioner spring. Accessory belt tensioners for these engines come preloaded, so there are no adjustments to be made. However, they will lose tension after a while. If you look at your accessory belt tensioner, you will find a tension gauge right where the body of the tensioner and the pulley arm meet, as seen in the image above.
The arrow should ideally point between the two rectangles. That said, it’s not the end of the world if it’s slightly shifted either way. If the arrow is all the way at the outer edge of a rectangle, you’re most likely dealing with a failing or failed tensioner spring.
Alternatively, you could see 3 dashes instead of the rectangle system. In that case, your tensioner should sit close to the middle one, or there about.
How to Replace the Accessory Belt Tensioner?
Replacing the accessory belt tensioner isn’t all that difficult. Getting to it, however, can be a chore. Here is the list of parts and tools you’ll need for this job.
Tools:
- 14 mm wrench and another open-ended wrench for leverage
- 8 mm socket wrench
- A universal joint extension set
- Socket wrench extension set
Parts:
Step 1 — Remove the Accessory Belt

First thing first, the accessory belt needs to go. Take your 14 mm wrench and mount it firmly on the bolt that goes through the tensioner pulley. Take another open-ended wrench and interlock it with the first one to get better leverage.
Push the pulley towards the passenger cabin (usually applies to all K24 engines, but check your manual just in case) to release tension from the accessory belt. Once the belt is loose, remove it from the power steering pump pulley. If you’re replacing the belt, take the old one off. If not, zip-tie it in place so that it doesn’t fall off other pulleys.
Step 2 — Remove the Power Steering Pump and the Power Steering Fluid Reservoir
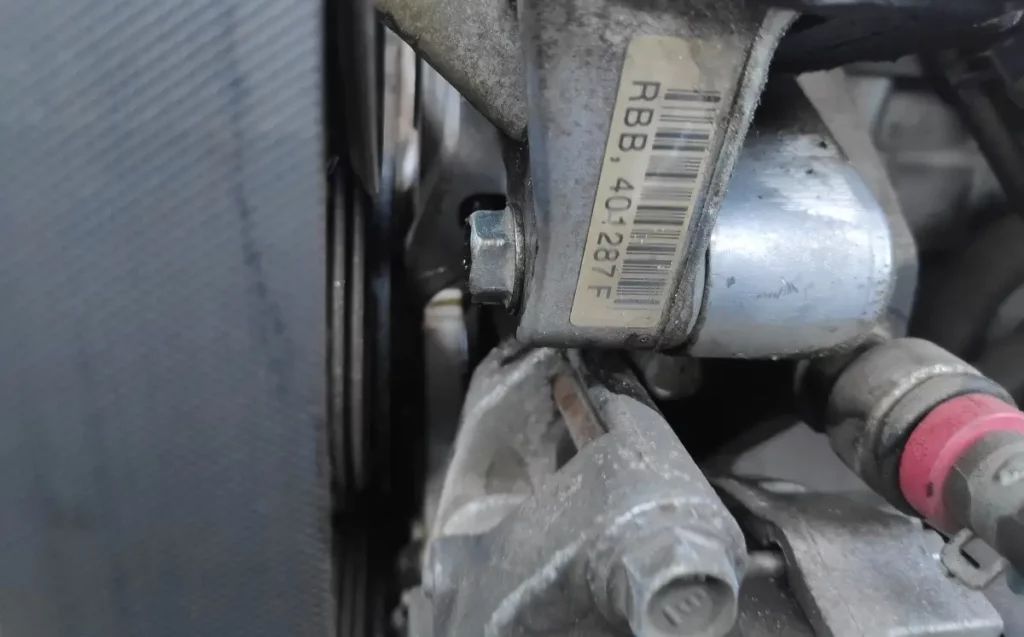
In order to reach the tensioner bolts, you need to remove the power steering pump. It’s held in place by two 8 mm bolts as seen in the picture above. Undo the bolts and place the pump on top of the engine without disconnecting the hydraulic lines.

You may need to unclip the high-pressure line from the bracket near the back of the engine in order to maneuver the pump.

With it out of the way, remove the power steering fluid reservoir from its bracket and tuck it in close to the windshield washer reservoir funnel. This will give you extra room to work with.
Step 3 — Remove the Front and Top Tensioner Bolts

Next up, take your 8 mm socket wrench and remove the top and front (or top and right if you’re looking at the engine from the left side) bolts that hold the tensioner in. These are easy to reach and should come out without much fuss.
Step 4 — Carefully Remove the Last Bolt

Okay, this is where things get tricky. The last bolt is hiding between the engine and the tensioner as seen above. It doesn’t help that this particular engine has a leaking VTC strainer, making it even harder to see the bolt. The bolt is very difficult to reach on certain models (1st gen TSX especially). If you can reach it easily, you’re golden.
If not, you’ll need a universal joint with an appropriate socket extension. The size of these two tools will depend on the amount of space you have. Be patient and be very careful with how you set the socket on the bolt. It needs to be snug, otherwise, you’re running a risk of stripping the bolt. You don’t want that. Try different universal joint and socket extension combinations until you find something that works.

Also, it’s highly recommended that you keep a telescopic magnet around just in case. Reaching for that last bolt can be tricky, and you wouldn’t be the first person to drop it deep into the abyss of your engine bay.
Step 5 — Install the New Tensioner Assembly
To install the new tensioner, simply repeat everything above in reverse order. Try to stick to manufacturer’s torque specs if possible, especially with those 8 mm bolts. Here are the torque specs for the 2007 Acura TSX K24 engine:
- Accessory drive tensioner bolts – 22 Nm/16 lb-ft
- Power steering pump bolts – 22 Nm/16 lb-ft
New Tensioner Assembly Pulley Bolt
One last thing to mention is that some OEM and aftermarket accessory belt tensioners come with a different size pulley bolt. Keep a set of open-ended wrenches nearby, because you might need something other than a 14 mm wrench to mount the belt back on.
Check the Tension Gauge
Once you put everything back together, check the tension gauge on the tensioner. If you’re reusing your old belt, it could sit a bit loose on the new tensioner. Similarly, if you’re installing a new belt, you might be on the tight end of the scale.
Not all belts that match the OE part number for your car are of equal length. There is usually a few millimeters difference between brands. Keep this in mind when selecting your new belt.
Get Quality Belt Tensioners From Newparts.com
Here at Newparts.com, we carry a wide range of genuine, OEM and aftermarket parts for your Honda and Acura. These include accessory belt tensioner kits, belts, pulleys, you name it. Select your vehicle using our vehicle selection tool, and you’ll only be shown parts that are a guaranteed fit for your make and model.